Warehouse Functions Menu - WM4
The main concept behind all warehouse procedures is that the orders and their status on the system must reflect how they are being processed in reality. The warehouse is the one point in the life of an order where physical events are taking place, such as picking, labeling, loading, and so on, and requires the most system interaction. If the system is not informed that an action has taken place, it will not know that it has happened. It is critically important that all actions taken in the warehouse that affect an order, such as a status change or an order change, are somehow made known to the system.
This menu provides all the options to run a warehouse.
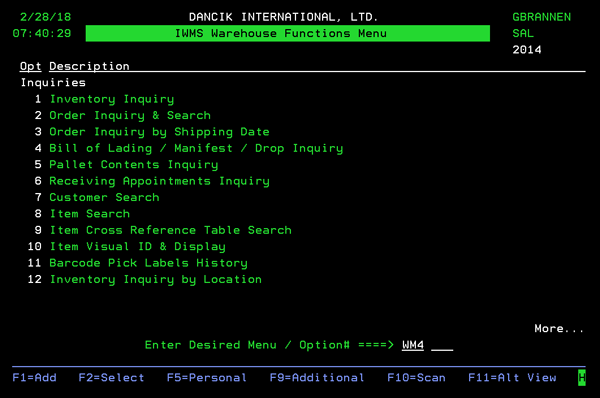
This program enables you to see past and current inventory levels, outstanding customer and purchase orders, and much more. Understanding the multitude of options included in this program is essential to using the system to its full advantage and to maximize turns on your inventory. We recommend that you read these instructions while at your terminal so you can try each option as they are described.
For more information, refer to Inventory Control.
The Order Inquiry and Search can be used to perform many different search and inquiry functions related to customer, purchase, and transfer orders.
All processed orders can be accessed by this program. Processed orders include open and closed orders. Processed orders are orders that have been printed as pick lists, purchase orders, acknowledgments, or invoices, or processed via F12 which processes orders without printing them.
For more information, refer to Order Entry
This option is not currently used.
This program allows you to find all the orders associated with a Bill of Lading, Manifest or Drop Number. It is accessed from option 19 on the Warehouse Menu.
For more information, refer to Warehouse Operations
Use this function key to print product labels.
For more information, refer to F20 - UCC-128 Label Maintenance Screen.
This option opens up the Management Screens and Reports - WM3
You can search for and select customer accounts in many different ways.
For more information, refer to File Maintenance .
This hotkey Item Search enables you to search by several categories. All of the categories are processed by positioning to the value you enter.
For more information, refer to Order Entry.
This table provides a quick and easy way to cross reference UPC and item numbers. You do not have to have the system generate UPC numbers in order to store them. You can store UPC numbers for any manufacturer.
For more information, refer to EDI and Bar Code Functions
This option is not currently used.
Option 12 - Inventory Inquiry by Location on the IWMS Warehouse Functions Menu (WM4) presents several options for searching through the inventory in your warehouse by individual locations.
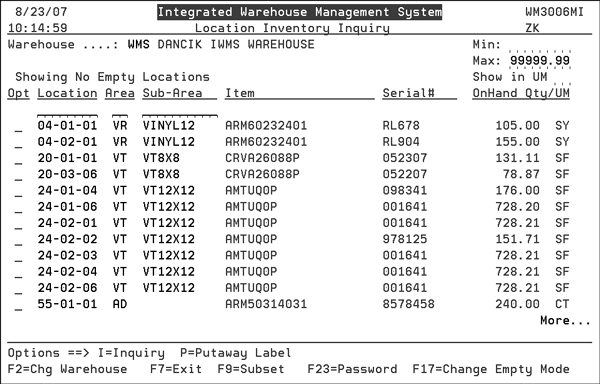
- As a default, the locations that appear first all have inventory stored in them.
- To view all the locations, even the ones with no inventory press F17.
- To narrow the locations displayed, you can use the Min and Max fields in the top right hand corner. In the above figure, there is no minimum level set and the maximum inventory limit is set to the highest entry 99999.99. These settings ensure that all locations display. You can use the Min field to identify locations that can be cleared out and then reused.
- Use the Show in UM field to convert units of measure. For example, you can convert the inventory from SF or SY to CT.
- UM conversion requires that the items contain the necessary UM conversions in the Packaging File.
- To inquire into a location, enter an I into its Opt column and press Enter.
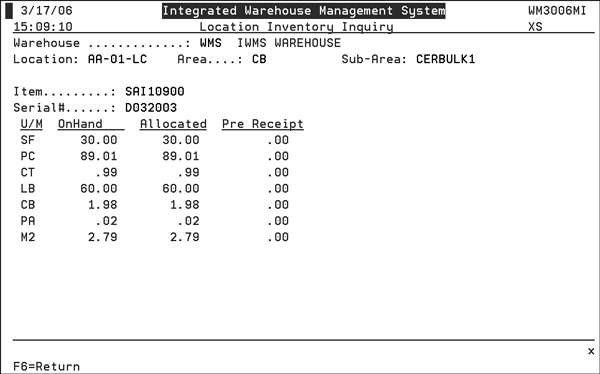
- The inventory in the location is displayed in several units of measure. You can also make a quick comparison as to what is on hand opposed to what is allocated and in pre-receipt.
Printing a Putaway Label
To print a putaway label for the material in the location, enter a P in the Opt field. The Label Confirmation Screen appears.
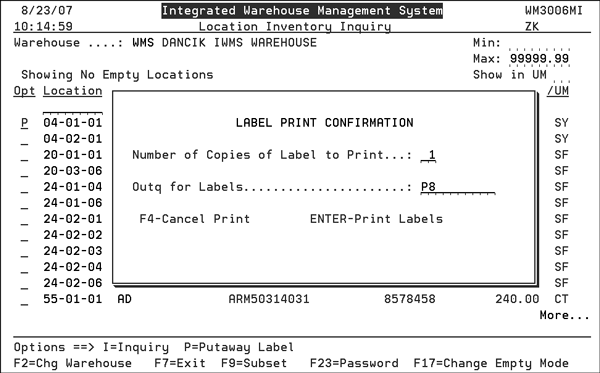
To display a listing of the available printers, enter a ? in the Outq for Labels field.
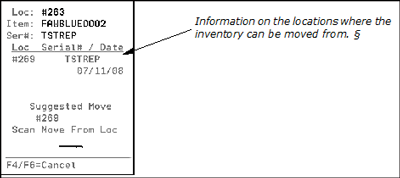
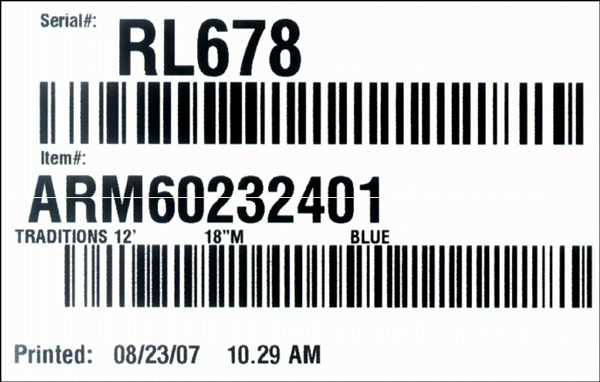
An example Putaway Label is shown below.
- Print Stock Locations List - This option lets you customize and run a report showing inventory locations. A series of screens lets you customize the report by:
- Print Free Locations List - The Free Locations report lists locations that do not have any inventory assigned. Locations can be broken down by warehouse or area.
- Print Un-located Items List - The List of Serialized Inventory Without Locations report identifies inventory that does not have an entry in the Location field.
- Print Warehouse Labels & Tags - For more information, refer to Warehouse Operations
Printing LPNs
License Plate Numbers (LPNs) group all the orders on a pallet under one number. Multiple order lines can be assigned to the LPN during the picking process, and then the LPN can be scanned to move and update all associated order lines.
Prior to building pallets, you can print several LPN forms and give them to the person building the pallets.
1. Select option 24 - Print Warehouse Labels & Tags on IWMS menu WM4.
2. On the Print Warehouse Labels menu that appears, select option 8 - To print a LPN Label.
3. All warehouses share the 10-digit LPN number wheel, so the number may not appear sequential between runs of labels.
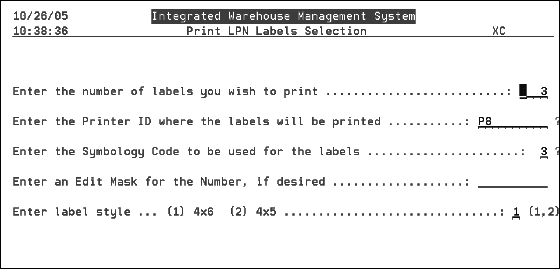
| Field | Description |
| Enter the number of labels you wish to print | Enter the number of labels you wish to generate. This will get the next number from the number wheel to start the numbering sequence. |
| Enter the Printer ID where the labels will be printed | Enter a valid printer ID where the labels will be printed. A ? will display a list of the printer ID's. |
| Enter the Symbology Code to be used for the labels |
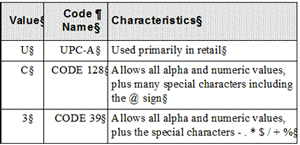
The Symbology Code can be thought of as the Font for the barcode labels. It determines the values that may be placed within the barcode. The RF scanner must be configured to read the symbology code you use, and may be configured to read multiple symbology codes. Most of the picking labels use a symbology code called Code 39. The biggest difference in the symbologies is what special characters they can contain. The valid entries for this field are:
|
| Enter an Edit Mask for the Number, if desired |
This field is used to overlay an edit mask on the label number. This is done to provide the user the ability to simplify the label number. Since the lifecycle of the LPN is the duration of moving the pallet through the picking process and shipping the pallet, the unique number may wrap from time to time, and still not inhibit functionality within the warehouse. The table below shows the template we used and the resulting LPN. In this example the number retrieved from the number wheel is 10024.
|
| Function Keys | |
| F2=Save | This function key will prompt for the user to enter a named template for the formatted label. All of the screen values will be saved so that using the F11 key may retrieve them. An example for this could be using the warehouse code in the edit mask, and when printing these labels, the user retrieves the template for their warehouse. |
| F9=Protect Mask/Unprotect Mask | This key toggles the ability to type over the edit mask for the label. This is installed as a safety feature to prevent unintended clearing of the edit mask |
| F11=Retrieve | This function key will display a list of saved LPN templates, to allow the user to select a predefined format. |
This option is not currently used.
The Bar Code Pick Labels Print Pool is used to help manage the flow of inventory picking. Its goal is to give you the flexibility to choose the most efficient management of your warehouse in addition to keeping the interface simple to use. As orders are entered, the picking requirements are stored in the Bar Code Pick Labels Print Pool. By storing the data in the pool, you are not required to print, file, and maintain labels for future ship dates. The pick labels are printed only when you need them. The selection screen provides many different sort sequences and also provides drill-down capabilities from each screen to the supporting data.
For more information, refer to Warehouse Operations
The Update Order Status and Shipping Data program allows you to inquire and update the status and location of orders.
For more information, refer to Update Order Status -WAR 5.
A cutting station is defined as a workstation located near a cutting machine used to perform status updates on cut orders. The Cutting Station Program is a special option within the Order/Shipping Status Update Program. Its purpose is to allow multiple cuts to be made while a roll is on the cutting machine that has more than one uncut order allocated to it.
This option provides a series of reports used to manage the loading and shipping of your orders. The reports may be printed for any selected date range and a number of other selection and sort parameters. Although these reports are primarily designed for optimizing deliveries and loading trucks, they may also be used in any warehouse environment to help measure and organize the work load. Selection criteria for reports can be set up on the Reports Default Maintenance Screen to enable the user to customize each report. Defaults are unique for each report type and warehouse for customer shipments, and report type and from/to warehouse combinations for transfers.
For more information, refer to Warehouse Operations
This function enables the warehouse to quickly update ship via, truck route, stops and ship dates.
For more information, refer to Warehouse Operations
Inventory Cycle Counts is a series of programs that enable you to perform complete physical inventory count by warehouse, and cycle counts on specific or random groups of items.
For more information, refer to Inventory Control
This program enables inventory adjustments to be performed by entering only a serial number. If the system determines that the serial number exists in more than one warehouse or bin location, it displays a pop up window from which you can choose the appropriate record to adjust. This window is also displayed if the same serial number is used for more than one item. This program enables you to perform three different types of adjustments.
For more information, refer to Inventory Control.
The Inventory Adjustment programs can be used to enter inventory adjustments due to situations such as damage, theft, cycle count variance, samples, write-offs, or measurement variations.
For more information, refer to Inventory Control.
This program lets you view all items and serial numbers currently in a location, and to process location changes. For example, you can move all of the items and serial numbers in a specific location to a new location.
For more information, refer to Inventory Control
When a natural stone slab is sold, it is often adjusted to usable dimensions, or to an agreed upon size after inspection by the customer. The slab Re-Sizer provides a consistent way of adjusting slab inventory. It operates much the same way as other inventory adjustments for other products, but optimized for the special aspects of slabs.
For more information, refer to Inventory Control
Allocation Swapping is the ability to easily switch orders between a status of allocated (assigned to inventory) and unallocated (on back order).
For more information, refer to Order Entry
The Inventory Transfers program enables the entry of transfers of stock from one warehouse to another. Transfers entered using this program affect inventory immediately and can be viewed via the Inventory Inquiry Stock Card Screen, or printed via the Print Audit Trail For An Item - RIV 1, Print Inventory Registers - RIV 6, Stock Activity Reports RIV 5, and Transfers Report - RIV 7 reports.
When exiting this program, the system automatically creates a report labeled HKTR or TRANSFER, held in the print spool queue. You can choose to print these reports by releasing them from the spool file, view them on screen, or cancel them.
For more information, refer to Inventory Control.
At any point during the day or following morning, master transfer pick lists are printed at each warehouse that needs to transfer material. These pick lists are requested using option 18 - Print Transfer Pick Lists, on the Inventory Menu or using option 7 on the Warehouse Menu. Each warehouse can request their own transfer pick lists, or they can be requested at one central location. These transfer pick lists print on the printers designated in the Warehouse File for each warehouse. Each warehouse can be assigned a printer on which to print transfer pick lists. Use the field labelled Designated Transfer Printer ID in the Warehouse File. If they are run during the day, these documents list all items requested for transfer during the day. If they are run on the following morning, they list all items requested for transfer during the previous day. They print on regular pick list forms. You can run transfers multiple times daily, including only the transfers created since the last transfers were printed.
For more information, refer to Inventory Control.
The Invoicing by Status Program, when combined with efficient warehouse procedures, can virtually eliminate the Order by Order invoicing function in all wholesale sales environment.
For more information, refer to Invoicing.
This program allows you to print COD orders or invoices by customer/stop, with complete totals. The totals account for delivery charges and minimum order charges. This program eliminates the need for drivers or traffic managers to determine any COD charges. The COD reports can be used to notify customers in advance of exact COD check requirements. The COD invoices can be delivered with goods. This program also provides an alternative to the Company Settings option which offers the choice of applying delivery charges to every COD order as taken, or to wait for invoicing in order to determine the delivery charge. If you use this program, set the Company Settings option to not charge delivery on COD orders. Then, using this program, you can provide drivers with either COD invoices or reports, which determine exactly what the total charges, including delivery, should be. This program groups COD orders for a customer together, exactly like the invoicing programs do.
For more information, refer to Warehouse Operations.

